Thursday, December 19, 2013

Fun at Winnie's Workshop

Today I want to send a shout out to some really talented friends of mine - Nancy and Meredith at Winnie's Workshop in Midway, Utah. Nancy is an expert with Wool Felting and Meredith is a masterful letter press artist. They are hosting an open house TODAY at there place so if you're in the area, stop by and try your hand at these old world arts. You can also take a virtual visit on their website 


Cute things I've made from felted wool sweaters and 
needle felting-techniques I learned from Nancy
Available on the Plein Air Boutique on etsy:


Enjoy!
- Janet


Tuesday, December 10, 2013

Met to Exhibit Couturier Charles James


If you are looking for a reason to visit New York this summer, this is it. The Metropolitan Museum has just finished renovating their Costume Institute and this is their opening exhibit. I'm mentioning it now so you can drop hints to those searching for the perfect Christmas gift for you. 

Charles James: Beyond Fashion

May 8–August 10, 2014

Charles James: Beyond Fashion

Anglo-American couturier, Charles James (1906-1978) is best known for his sculptural, mathematical approach to design, especially elegant ball gowns. Without formal training and amidst a very turbulent career (including bankruptcy and IRS forced closure), James became one of the most influential designers of the 20th century. Collaborating with many now famous fashion designers and icons throughout his career, he sadly died from pneumonia - alone and penniless at the Chelsea Hotel in 1978.

From the Met's exhibition info. -

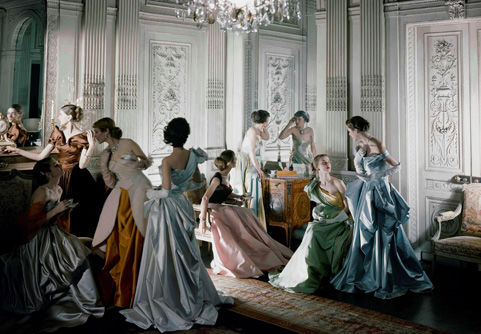
The first-floor special exhibition galleries will spotlight the glamour and resplendent 

architecture of James's ball gowns from the 1930s through 1950s with an elegant tableau 

celebrating such renowned clients of his as Austine Hearst, Millicent Rogers, and 

Dominique de Menil. The New Costume Institute's Lizzie and Jonathan Tisch Gallery will 

provide the technology and flexibility to dramatize James's biography via archival pieces 

including sketches, pattern pieces, swatches, ephemera, and partially completed works 

from his last studio in New York City's Chelsea Hotel. 


Charles-James-hero.jpg

Photograph by Cecil Beaton. Published in Vogue, March 1, 1948


Charles James, ca. 1950.

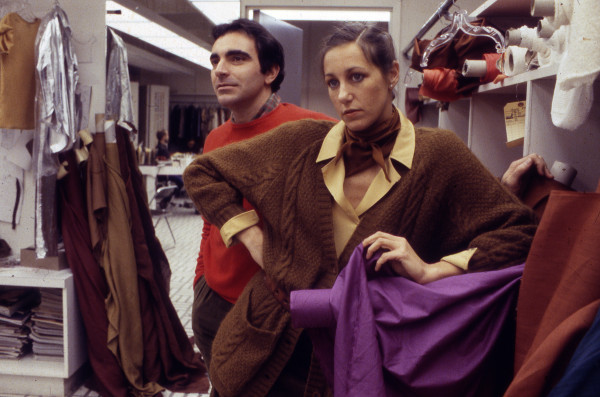
Charles James and models, 1950


The Swan by Charles James

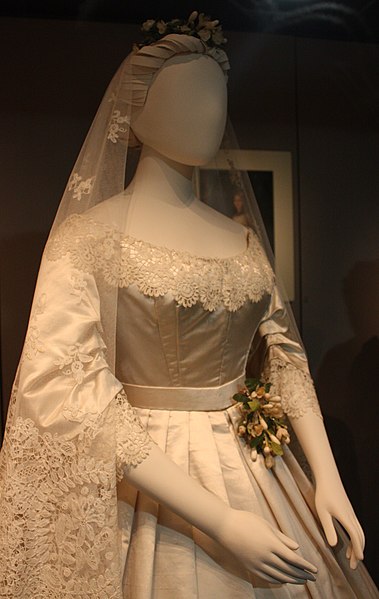
One of James' notable gowns, 'The Swan'


So, save a little cash in reserve from the holidays toward a NYC summer trip to see masterful haute couture from one of the finest.

- Janet


Wednesday, December 4, 2013

A Little Christmas Sparkle


In response to our first real winter snow, I thought I'd share a little DIY project that can bring that snowy sparkle indoors. This one takes little time, money, or effort...the best kind of project this time of year!

Shimmering Branches

Here's what you"ll need:

  branches
  Epsom salt
  school glue
  foam brush
  plastic cup
  large baking sheet
  parchment paper or any liner you have
  aerosol hairspray


Water down the glue until it is thick enough to stay on your brush but not gloppy. Line your baking pan with paper. Pour out about a cup of Epsom salt on the paper. Lay your branch on the pan and brush with glue.
To make it realistic, apply the glue heavier in crevices where snow would collect. Sprinkle salt wherever there is glue. Tap off excess. Epsom salts are water soluble so they melt a little when they come in contact with the glue. I love this because it behaves like real snow and melts a bit into the branch. If you want a little more sparkle, sprinkle fine glitter on as well. 
When dry, spray with hairspray. These are only for indoor use as the salts will melt.


Voila! Snow covered branches! I paired mine with some cuttings from a pine tree. They look pretty alone as a centerpiece but if you use sturdy enough branches, they will hold ornaments.


Discard the salts on the pan by folding up the paper. Save the rest of them in the bag and soak your feet after a long day of shopping!

Enjoy!

- Janet


Tuesday, November 26, 2013

Silver, Mums, and Gratitude


Growing up, Thanksgiving at my house was pretty close to Norman Rockwell's depiction. Grateful for family, food and love. While my mom's Parker House rolls baked, I remember having two jobs -arranging mums cut from the backyard into a centerpiece and polishing the silver. Among the items needing a little TLC was this lovely pair of Empire style salt and pepper shakers. Aren't they beautiful! They belong to me now as part of my mom's very smart practice of giving items from our childhood to us as gifts. They mean so much more than any store bought present! 

So, today as I'm polishing the silver in preparation for Thanksgiving Dinner that I'll be hosting, I thought maybe it would be timely to post a bit on silver care. so...


Some tips on silver care from me and Tiffany’s:
(Can't argue with Tiffany's -the authority on all things beautiful)

Sterling silver tarnishes, especially when exposed to salt air and products containing sulfur, such as rubber bands and some papers. However, silver that is regularly used typically needs less care, so Tiffany strongly encourages you to use or your silver frequently and so do I. The notion of ‘saving’ items is kind of sad to me. What is so special in the future that could be more important than enjoying your beautiful things now?

Washing Silver

Tiffany recommends washing silver by hand in warm water with a mild detergent. Because many food acids and gases in the air can have a corrosive effect, they suggest that you wash your silver immediately after use. Silverware, and especially knives, should not be left to soak in water. To avoid spotting, it is important to dry your silver immediately after washing. 


Polishing Silver


 Tiffany sells a spray that works great on items with small crevices like candlesticks


Pastes like Wright's or Weiman are good for large areas
                   
                                                                                                                      photo from for the love of a house.blogspot

Use a good paste silver cleaner. I like Wright's silver cream but lately I've only been able to find Weiman.  The spray from Tiffany is great, too. Some "dip" polishes contain harsh chemicals and should be avoided. Some people say to use Electrolytic cleaning (aluminum foil, salt and baking soda in a water base) I don't recommended it. 

Begin by using a soft cloth or sponge to apply the polish. Rub each piece gently but firmly lengthwise, using straight, even strokes. You may use a small brush (like a toothbrush with natural bristles) for decorative trim or borders. Wash in sudsy dish soap water, being sure to remove all the polish. Rinse well in warm water, dry thoroughly and buff gently with a soft cloth. Don’t twist, especially items with stems. I learned this the hard way, twisting a stem loose from a compote dish. So sad.

Leaving a Little Patina

An "oxidized" finish is the deliberate blackening of crevices in the ornamentation of a silver object to make its decorative details stand out more clearly. Take care as this finish can be removed by overzealous cleaning and polishing.  A little tarnish is actually patina and can denote age and value.


Happy Thanksgiving - Use all your 'good stuff' and leave some of it out to enjoy all year!

- Janet

Tuesday, November 12, 2013

Why are Bridal Gowns usually White?


I have been hunting for the perfect champagne colored lace- in a sea of white and ivory- to use for my niece's bridal gown, and it got me thinking about laces and the tradition of using white for wedding dresses.

When asked why wedding gowns are usually white, most people will say that traditionally, white was worn as a sign of purity. Well, actually, that wasn't really true until the 1920's or so. Throughout history, brides wore their best dress, whatever the color. White was used as a bride's choice primarily to show wealth and status. Creating a white fabric was a costly process, therefore the using of it showed the family's wealth. 

Queen Victoria, being a fashion icon, popularized the wearing of white and lace when she married her true love, Albert in 1840. It was considered unusual as colored gowns had been the norm. For Victoria, it was a political move. She chose Honiton lace, a British lace made in Honiton, Devon, providing a much needed boost to the local lace industry. She certainly wasn't the first to wear white for her wedding, but being one of the most popular royals ever, she is associated with the tradition.


Queen Victoria Wedding
Queen Victoria and Prince Albert's wedding, 1840


Queen Victoria poses in her wedding dress
A portrait of Queen Victoria in her Honiton lace wedding gown


Here are some beautiful up close photos of Honiton lace. It is a hand woven bobbin lace and like all bobbin laces, it is very time consuming to produce. It can take about 4-5 hours to make a centimeter of lace.


Detail of Honiton lace lappet, Cardiff, mid-19th century

File:WLA vanda Wedding Dress worn Eliza Penelope Clay Joseph Bright 1865.jpg
1865 wedding ensemble trimmed with Honiton lace.

Prince William, Prince George
Prince George in a replica of the Honiton lace christening gown worn by his father.
nwar Hussein/WireImage; John Stillwell/PA Wire/Press Association via AP Images


This beautiful lace is still in use. In fact, little Prince George, was christened in a gown made from Honiton lace, just as were generations before him.
So, there you go, a few little tidbits on weddings and lace.
Enjoy!

-Janet


Tuesday, November 5, 2013

Hemlines - The Long and Short of it


photo-Vogue UK


For most of the 20th Century, women waited for fashion gurus to dictate the acceptable hem length- anticipating whether their wardrobes would need revamping each season. Post WWII, Dior produced skirts fuller and longer than any available during the war, creating an overnight sensation and making what most women had in their closets obsolete.


Dior's 1947 Senstional Collection, including this peice, The Bar Suit

In the 1970's, designers provided multiple skirt lengths. The ultra-mod mini skirt of the 60's was joined by the midi and the maxi and women finally had a validated choice!

Most of us now combine what is happening in high fashion, street fashion, global trends, vintage influence and mix it all together to create our own style, often unaware of and unconcerned where the original influence began.

This fall, things went a bit retro, not only in style, but in the collective vision of designers showed on hem length...

The Midi length was all over the runway. 


Flounced midi by Celine

Classic Pleated by Rochas

Straight Long Pencil from Valentino
photos- Style.com

The longer length midi skirt, hitting anywhere below the knee to the the below the calf, was shown by almost every designer. It is a flattering length for most women and certainly refreshing to see, but it can make you look a bit frumpy if you're not careful. Here are a couple of tips:

-all midis are not created equally...it's just the length that they have in common- other than that, they come in many styles: straight, sarong, A-line, gathered, flounced, etc. Find the style that works for your figure. See my past post - how to measure yourself and figure out your figure here.

-watch where it hits on your calf, if it lands on the fullest part of your leg, right in the middle, it can be a bit unflattering - just below the knee and just above or below the largest part of your calf will look the best.


-choose your shoes carefully-pair with a slim, pointy toe heel or flat shoe works well. A big platform is not a good option here.

-keep you eye on the silhouette created. A slimmer skirt can handle a fuller top but you can get a bit of a  'sack tied in the middle look' if the top and skirt are both full. Choose a more fitted top with a full skirt.


-take a good look in a full-length mirror to find the best combo of blouse, shoe, and skirt. Generally, I think the fuller the skirt, the sleeker the shoe- just take a look at the whole silhouette you've created. Take cues from the gals in the 50's wearing all those Dior inspired looks. 


Although I don't believe we will ever allow ourselves to be dictated to by design houses so emphatically, it is interesting to watch the evolution of style trends and to see once again the 'top down' -designer to consumer- influence on hemlines. 


So, don't throw out your knee-length pencil skirts or toss your maxi dress. It still is a 'wear what you want and make it work' era. Find the silhouettes that work for you. Have fun with this 'new' length and be glad we have one more great option out there from which to choose!

-Janet


Tuesday, October 29, 2013

Goodbye Zombies


Call me old fashioned, but I like Halloween to be a fun, lighthearted children's holiday. I know there are those out there who love the bloody zombies, psycho haunted houses, and severed limb chainsaw stuff, but for me, Halloween is about carving pumpkins, finding a costume out of the old dress-up bin, and making caramel apples. I guess that's because I grew up anticipating the annual TV showing of It's the Great Pumpkin, Charlie Brown, dressing up like a pirate, and trick or treating with my friends 'til our pillowcases were too full to carry.

When my kids were young, I loved that our elementary school had the traditional Halloween parade through the halls complete with class parties, glazed doughnuts, and a bean bag pumpkin toss. I'm all for keeping a little charm in Halloween.

A great way to get into the Halloween spirit with children is to read a seasonal story. So, leave the Zombies behind, get the apples, put on the caramels to melt, and read one of these favorites:


     Heckedy Peg - A great tale about a witch and the importance of obeying your mom!  Love the illustrations.


     Pumpkin Moonshine - Nobody does charming like Tasha Tudor - I wrote a bit about her incredible life and career here

Tasha Tudor’s first book, Pumpkin Moonshine, first published in 1938


     Hildilid's Night - A Caldecott winner and great story about overcoming fears.


     Stellaluna - The little bat who thought he was a bird. Kind of a retelling of the ugly duckling story. 


Have a fun, safe, and wonderful Halloween!


-Janet


Tuesday, October 22, 2013

Donna Karan and Me


As I was finishing design school in the early eighties, women's fashion was all about menswear. Professional opportunities for women were more accessible than ever before. Films like Working Girl popularized the importance of 'dressing the part'. Reacting to this 'new high-power career woman', fashion for women mimicked the style for the professional man. Designers like Giorgio Armani, with his men's tailoring background, hit their strides. Styles were masculine - tailored suits, buttoned-up shirts, and of course the enormous shoulder pads. If, by some slight chance, your blouse didn't have shoulder pads sewn in, you added a pair of foam ones- even in your t-shirts. 

About this time, after great success and a Coty Award, designer Donna Karan left Anne Klein and started her own company. 


Donna Karan and Louis Dell'Ollio - design partners for Anne Klein, 1980
Getty Images


We both launched our first collections in 1985 - mine to a couple of hundred people in a vacant office space and hers to a slightly larger audience- but we shared similar philosophies - Easy to wear designs for real women.
Her show opened with the models wearing only black body suits and tights then progressively adding wrapped skirts, pull on pants, jackets, etc. -Showing the versatility and layering ability of her collection, Seven Easy Pieces. It was brilliant.


Karan's first collection, 1985 
photo credit WWD

I was very inspired by Donna Karan. Her idea to design 'Modern clothes for Modern people', resonated with me. I felt that women wanted to dress to feel beautiful, but didn't want to take all day doing it. 
After almost 30 years, I still feel that way. Early on I designed a few simple silhouettes that have remained staples of my collections for years, updating fabrics and lengths. I've kept the same philosophy of style and dare I say 'comfort'. Not all the way to 'I'm in my sweats' comfort, but the 'I feel put together and I'm not tugging or pulling on anything and I can actually sit down in this' kind of comfort. 


This season's version of my signature sarong skirt in black stretch lace with ivory lining.
Currently available in the Plein Air Shop
 https://www.etsy.com/shop/PleinAirBoutique


So, as she celebrates her 65th birthday this month I say, 
Donna Karan
Donna Karan, photo Ruven Afandor

Happy Birthday, Donna Karan! 
and thanks for the inspiration and confidence you sent my way to design 'woman to woman'.

Janet


Tuesday, October 15, 2013

Re Discover A Classic - The Dresser Scarf


As a child, one of my Saturday rituals was to clean off the clutter from the top of my dresser (and believe me, there was plenty of stuff on there), dust it, and change the dresser scarf - one of the many items that has gone by the wayside in our contemporary homes. These elongated, decorative textiles were a mainstay on most bureaus but sometime in the 70's they became thought of as 'old fashioned'. I'm not sure why, but they disappeared (except in our house) along with the 100% cotton shirts in the ironing basket. 

Recently, they made a comeback with the whole 'shabby chic' trend but I think they can be used with just about any decor if you choose the right cloth. You don't have to embrace the whole look, just add a little vintage element to your room. Simple white ones like this beauty on the left, look great in a more contemporary setting, adding a little interest while keeping a clean look. The more decorative, vintage embroidered ones, like those pictured on the right, create a little antique charm. 


Why use them? 

Well, I have two great reasons-
     1- They protect your wood. 
        (Setting a glass down on the fabric will help keep those nasty rings from ruining your table)
     2- Like all textiles, they add texture and warmth to a room. 

Just look at this beautiful handiwork:


You can find dresser scarves at estate sales, consignment shops, and even in our shop!  https://www.pleinairdesign.com

Depending on their condition, they may need a little cleaning so here are a few tips:
  • fill the sink halfway with warm water and about a teaspoon of mild soap. I like to use Ivory liquid. 
  • spot any stains with a paste of oxi cleaner mixed with water
  • place your cloths in and let them soak for about 1/2 hour

  • drain soapy water and fill again with clean, warm water
  • do this several times without wringing the cloth, press it gently against the side of the sink

  • when water is clear, the soap is out and your cloth is clean
  • gently lift it out of the water and roll it in a clean towel

  • let it dry flat on another clean, dry towel
  • iron any embroidery face down into a towel to keep the 3-D effect of the pattern at its best. most of these vintage cloths will be cotton or linen and can handle a cotton iron setting with steam

  • you may use starch if desired-starch always works best when the cloth is a little damp, absorbing into the fibers instead of just sitting on top, flaking off when heated

Of course, you don't have to save these beauties your dresser. They look great as a runner for the dining table,  set out with a yummy brunch on your buffet, or placed under a stack of coffee table books. Enjoy!

- Janet