Tuesday, October 22, 2013

Donna Karan and Me


As I was finishing design school in the early eighties, women's fashion was all about menswear. Professional opportunities for women were more accessible than ever before. Films like Working Girl popularized the importance of 'dressing the part'. Reacting to this 'new high-power career woman', fashion for women mimicked the style for the professional man. Designers like Giorgio Armani, with his men's tailoring background, hit their strides. Styles were masculine - tailored suits, buttoned-up shirts, and of course the enormous shoulder pads. If, by some slight chance, your blouse didn't have shoulder pads sewn in, you added a pair of foam ones- even in your t-shirts. 

About this time, after great success and a Coty Award, designer Donna Karan left Anne Klein and started her own company. 


Donna Karan and Louis Dell'Ollio - design partners for Anne Klein, 1980
Getty Images


We both launched our first collections in 1985 - mine to a couple of hundred people in a vacant office space and hers to a slightly larger audience- but we shared similar philosophies - Easy to wear designs for real women.
Her show opened with the models wearing only black body suits and tights then progressively adding wrapped skirts, pull on pants, jackets, etc. -Showing the versatility and layering ability of her collection, Seven Easy Pieces. It was brilliant.


Karan's first collection, 1985 
photo credit WWD

I was very inspired by Donna Karan. Her idea to design 'Modern clothes for Modern people', resonated with me. I felt that women wanted to dress to feel beautiful, but didn't want to take all day doing it. 
After almost 30 years, I still feel that way. Early on I designed a few simple silhouettes that have remained staples of my collections for years, updating fabrics and lengths. I've kept the same philosophy of style and dare I say 'comfort'. Not all the way to 'I'm in my sweats' comfort, but the 'I feel put together and I'm not tugging or pulling on anything and I can actually sit down in this' kind of comfort. 


This season's version of my signature sarong skirt in black stretch lace with ivory lining.
Currently available in the Plein Air Shop
 https://www.etsy.com/shop/PleinAirBoutique


So, as she celebrates her 65th birthday this month I say, 
Donna Karan
Donna Karan, photo Ruven Afandor

Happy Birthday, Donna Karan! 
and thanks for the inspiration and confidence you sent my way to design 'woman to woman'.

Janet


Tuesday, October 15, 2013

Re Discover A Classic - The Dresser Scarf


As a child, one of my Saturday rituals was to clean off the clutter from the top of my dresser (and believe me, there was plenty of stuff on there), dust it, and change the dresser scarf - one of the many items that has gone by the wayside in our contemporary homes. These elongated, decorative textiles were a mainstay on most bureaus but sometime in the 70's they became thought of as 'old fashioned'. I'm not sure why, but they disappeared (except in our house) along with the 100% cotton shirts in the ironing basket. 

Recently, they made a comeback with the whole 'shabby chic' trend but I think they can be used with just about any decor if you choose the right cloth. You don't have to embrace the whole look, just add a little vintage element to your room. Simple white ones like this beauty on the left, look great in a more contemporary setting, adding a little interest while keeping a clean look. The more decorative, vintage embroidered ones, like those pictured on the right, create a little antique charm. 


Why use them? 

Well, I have two great reasons-
     1- They protect your wood. 
        (Setting a glass down on the fabric will help keep those nasty rings from ruining your table)
     2- Like all textiles, they add texture and warmth to a room. 

Just look at this beautiful handiwork:


You can find dresser scarves at estate sales, consignment shops, and even in our shop!  https://www.pleinairdesign.com

Depending on their condition, they may need a little cleaning so here are a few tips:
  • fill the sink halfway with warm water and about a teaspoon of mild soap. I like to use Ivory liquid. 
  • spot any stains with a paste of oxi cleaner mixed with water
  • place your cloths in and let them soak for about 1/2 hour

  • drain soapy water and fill again with clean, warm water
  • do this several times without wringing the cloth, press it gently against the side of the sink

  • when water is clear, the soap is out and your cloth is clean
  • gently lift it out of the water and roll it in a clean towel

  • let it dry flat on another clean, dry towel
  • iron any embroidery face down into a towel to keep the 3-D effect of the pattern at its best. most of these vintage cloths will be cotton or linen and can handle a cotton iron setting with steam

  • you may use starch if desired-starch always works best when the cloth is a little damp, absorbing into the fibers instead of just sitting on top, flaking off when heated

Of course, you don't have to save these beauties your dresser. They look great as a runner for the dining table,  set out with a yummy brunch on your buffet, or placed under a stack of coffee table books. Enjoy!

- Janet


Tuesday, October 8, 2013

The 'Darwin' Garden

My mom describes her late fall garden as a Darwin Garden - survival of the fittest. We both love to work in the flower beds, but about this time, we are a bit tired and figure it's time for them to take care of themselves a bit. I love fall - watching the leaves turn red, gold, and orange, but each year these are what take me by surprise:
FALL ROSES !

These beauties know how to survive! I have to tell you that roses are one of my favorite flowers any time of the year, (my birth flower, after all) but fall roses seem to be such a lovely close to one season and greeting to the next. After the high temperatures have passed and the garden gets to rest a bit, it seems like these blooms are giving a little 'thank you, for a great summer'. 

Most of the roses I enjoy are not really even mine. They were planted years ago by Grandma Hazel, the kind woman next door. (Also famous for her kid friendly 'toy drawer' and oatmeal cookies.) She passed away several years ago but her roses live on. The many bushes that line my driveway, bordering our yards, were chosen by her and her sweet husband, Edwin. Hazel sat on the step of my house teaching me how to prune and care for the bushes. We had a deal...She would teach, I would do the work, and cut whatever I wanted. I definitely came out the with the better end of that bargain, wouldn't you say? Her grandson and family live there now and kindly allow the terms of that agreement to continue, phew!


These rose hips below are spent blooms from climbing yellow roses that weren't picked. They are great for a fall arrangement and need to be cut now anyway or they will thwart new blooms in the spring.  To pick them now, use clean pruners and cut at an angle. (During the growing season, cut about 1/4" above a 5 leaf grouping to encourage more blooms -this goes for all rose bushes.)

If you live in a cold winter place like me, don't prune heavily until frosts are gone and temps begin to warm up. I'll give a review of what Grandma Hazel taught me on late winter pruning in a few months. Until then, just trim any long branches to keep them from snapping from the heavy snows and wait to do more.

For now, enjoy these Fall Presents from the Garden!


Tuesday, October 1, 2013

Fall Is Here!


As the season changes and temperatures drop, it's time to think about layering and accessories. Yay! One of my favorite ways to warm up my wardrobe is to add a scarf. Scarves are easy to use, take little money, and can quickly change the mood of your outfit. I especially love vintage scarves. The are affordable and I like the uniqueness and 'one of a kind' element they add to a look. There are many tutorials on tying scarves but most of them use large, modern ones. (links to a few sites I like are at the bottom)
  
 Here are a few suggestions for completing your look using vintage scarves:


The Audrey Hepburn -


Tie a small square just once around your neck and turn it a little off center. Isn't this a pretty ombre chiffon scarf, transitioning from umber to a warm yellow? Perfect for fall. Tying this way is a very 1950's-early 1960's way to sport a little color and bring attention to the face. It worked for Audrey...it will work for you.


Downton Abbey Chic with Deco Brooch -


This works best with a chiffon oblong.  Chiffon is sheer and light, doesn't create too much fullness, and was the fabric of choice in the 1920's. The brooch will help it stay in place and you can pin it through to your sweater if you want. Just be careful to use a pin that doesn't have too big of a stem as it may put a hole in your scarf. 


Flirty 50's Ponytail -


Always chic and a super easy way to tidy up that ponytail and add a burst of color or pattern. -Makes even the humblest pony look finished. Fold on the diagonal. You can tie a square knot and perhaps a little bobby pin to make sure your scarf doesn't slip off. This works with a small square, little larger square or even an oblong, depending on how much tail you want to hang down.


Elegant Side Brooch -


A large square folded on the diagonal or a long oblong will work for this. The 'earth tones' popular in the1970's are complemented with the vintage brooch (gold, of course) also from the era. This creates a pretty drape down the side and looks great for evening as well. 


Kerchief -


Fold a large square on the diagonal and then put it under your chin. Wrap the tails around your neck and tie them in a square knot in the front. I love the cowl effect this creates.


Euro Loop -


Who doesn't love this effortless way to wear an oblong? It works for both heavy and light weight scarves. Just fold in the center, creating a loop for the tails to go through. This even works well with the large pashminas we all love. 


Double-back Loop -


Like the Euro but put just one tail in then wrap the other tail around the loop once before pulling through. Adds a bit more complexity and fullness to the center - also holds together a bit better.


Purse Tie -


Scarves don't have to be just for your head or neck. Tie one on your handbag to add texture and color to  coordinate with your outfit.


'Annie Hall' Menswear Tie -


Just like a simple men't tie, this gives a finished look to a simple outfit. Keep the knot a bit loose to add enough fullness and softness. This would look so cute with a turtleneck, pencil skirt, and boots! Super 70's inspiration. Very 'groovy'. 


Headband - front knot or nape of the neck - 


This classic is great for either short or long hair. By tying it in the front, you create a little bow, under the hair in back makes for a smooth headband. Longer scarf ties can hang down the back. Secure with a bobby pin for extra stability.


Try one of these and you'll get hooked on scarves as easy, chic accessories.
All of the scarves and brooches shown are available in the Plein Air Boutique.

Use the url below or click above on the menu bar - Shop Plein Air Boutique


A couple of good contemporary scarf tutorials:
http://shop.nordstrom.com/c/scarf-video
http://www.youtube.com/watch?v=5LYAEz777AU


Tuesday, September 24, 2013

How to Measure Up


How many articles of clothing do you keep trying to wear, thinking “this time I will like it”? You take it off as soon as you get home, either push it to the back of your closet or throw it in the charity pile. So many women shop without  knowing what will truly work for their figure and end up frustrated and discouraged with themselves.

Determining your 3 basic measurements and your body shape are the first steps in learning how to dress to feel your best. Every woman has positive features she would like to accentuate as well as a few she would rather not draw attention to.

Knowing your measurements helps you avoid even trying on clothing that will not work for you. Shop with a purse size measuring tape. Measure the garment’s 3 basic measurements prior to the trip to the dressing room. You may want to take a few measurements of your favorite pieces at home like the length of a well-loved skirt or the inseam of your best ‘go to’ pants.

Examining your shape allows you the to gain a better understanding of what these positive and not so favorite areas are, helping you to dress in the most flattering way for your figure. Measure your body with little or close fitting clothing on – you may have someone help you or do this looking in the mirror in profile. Write these 3 measurements down:


tape measurements
 
Bust: Stand up straight and wrap the measuring tape around your back and across the fullest part of your breasts, keeping the tape parallel to the ground. Pull the measuring tape as taut as you can without changing the shape of your breasts. Don’t squish.
                                                                                                                                                        
Waist: Wrap the measuring tape around your middle, at the smallest part of your natural waist. Wrap it flat around your back, close to you but not pulling tight, again keeping tape parallel to the ground, and meet just above your belly button.

Hips: Hold the measuring tape below your hipbone, at the fullest part of your hip. Then keeping it parallel to the ground, wrap it around the largest part of your butt (no cheating!), and bring it back to the meeting point.


Now that you've measured yourself, use those numbers to help determine your silhouette shape. These ideas have been around for awhile but can get kind of confusing. Here are the concepts pared down to 4 basic shapes and a formula of sorts that can help most women identify their silhouette. Using the 3 basic measurements above calculate the difference between your bust, waist, and hips. Use the guide below to determine your basic shape.


Examples
             B 43”, W 36”, H 42”      B 36”, W 34”, H 38”     B 34”, W 26”, H 42”       B 38”, W 27”, H 38

OK, now some basic guidelines to trick the eye:

It is all about proportion and balance - The two keys to visual harmony.

Use fullness, color and contrast in areas that you want to appear increased.
examples: If you are ‘pear’ shaped, balance a larger hip by adding a gather at the top cap of the sleeve, wear a lace embellished collar, use a horizontal stripe across the top of a T-shirt, wear a wide boat neck. ‘Ruler’ type?, try an A-line skirt that adds shape at the hip and hem or a surplice wrap that creates a little gather as it ties at the waist. A V-neckline is good on almost everyone. As is a wrap style.
Avoid fullness (puffs, gathers, pleats, etc.), style lines, and contrasting colors in areas you want to diminish.
examples: If you are ‘apple’ shaped, accentuate your legs (probably one of your best assets) by wearing slim pencil skirts, pants that are slim legged. Avoid a gathered waist skirt or one that is pleated from the waist. Keep the silhouette of your tops clean-lined and avoid ‘baby doll’ or yokes with falling gathers over the bust. 
‘Hourglass’ figures have a natural balance between bust and hips but over accentuation of the waist by cinching too tightly can create too much contrast. Also, avoid wearing clothing that is too tight. (all shapes)This will actually make you look heavier. A little ‘ease’ is flattering.
Lastly, a couple of suggestions:
  1. The best investment you can make to your wardrobe is a full-length mirror. Get one, use one, and look at the back of yourself as well before you leave the house.
  2. If you are tugging at something, it isn’t working for you.
  3. Remember, you’re worth dressing with style just the way you are. Don’t wait for that day in the future when you lose weight, get the tummy tuck, or whatever it is you think you need.
 Enjoy your next Shopping Trip !


Monday, September 16, 2013

How to store a Wedding gown

weddinggowneditphotoshop2


Now that the Summer Bridal season is over, I’m getting a lot of people asking me how to store their gowns. First, let me say do not use the commercial boxing/sealing services by dry cleaners. As a former historic fashion curator, I have seen many pieces ruined by being sealed up with cleaning chemicals. Sealing up textiles airtight is never a good idea. Textiles like to breath just like you. A good rule for clothing and textiles is store them in climates where you’d feel comfortable. Would you want to be sealed up in an airtight box and never let out again?  And, why store an heirloom if you can never look at it again?  - so here are a couple of good options:

You can hang it on a prepared hanger and store in a cotton bag, or box it in an acid free box with acid free tissue and store it somewhere flat, cool, and dry. A few important rules for Historic Costume/Fashion Storage – Never store anything in the hot attic, or damp basement, Don’t seal it air tight, and never ever store in plastics, and remember, further wearing of  it will diminish the preservation (but it would be awfully fun if your daughter wore it someday!) 
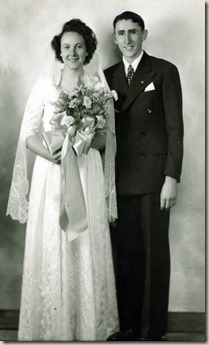
I’m using my Mother’s 1946 gown and veil today as the example. My sister and I used it when we got married. There’s a great WWII bride story behind that beautiful veil. I’ll tell you about it another day.
clip_image002

PREPARING IT TO HANG – This method is best for gowns that are lighter weight and have a sturdy shoulder. Not recommended for sheer or delicate shoulders. A strapless gown can be hung on loops sewn securely to the bodice, but I recommend boxing for most bustier styles as the skirts are frequently heavy and can pull the bodice too much.
Have your dress professionally cleaned (get a reference for a good dry cleaner from the bridal store) and hang it in an open area for a week to let the chemical products air. Button and zip all closures and remove any pins or excess items from the gown. Lightly Stuff the sleeves, bodice and anywhere that can hold it with a few sheets of lightly crumpled acid free tissue. See the discussion on tissues in the Boxing It section below.
Start with a sturdy hanger as your base. I like to use the satin covered ones. Remove the covering and stuffing and set aside. Measure the shoulder width of your dress.

                  P1010015                     P1010020

Cut the hanger to the same length. Sand the edges. Cover with original covering and stuffing. Using a pair of clean, white 100%cotton socks, create a second covering. Stuff tight with polyfil, creating a circumference of about 4”. You are creating a support to distribute the weight and mimic a shoulder. Stitch socks together at center. Place your gown on the hanger.

P1010021

If available, you may put your dress in a pre-made 100% cotton garment bag. K-Mart used to sell these under the Martha Stewart line but I haven’t seen them in awhile. If not, you can create your own. Measure the shoulder width of the gown +4” , the width of the gown at the widest part of the skirt (usually the at the hem) + 4”, and the length of the gown + 4”. Using pre-washed, dried with no products, 100% cotton muslin, cut 2 pieces using gown measurements. Stitch the shoulder seam and hem seams first, then one side seam all the way up and leave the second side seam open from the shoulder to 3/4 of the way down. You can slip the gown into the bag and tie it up with ties made from cotton shoe laces or cotton ribbon, sewn every 4-6” down the side of the bag. Store uncrushed in a cool, dry closet. Check it periodically for signs of moisture.

P1010025
                                   

P1010027

BOXING IT – This method is definitely the safest for insuring that the gown doesn't get ‘stressed’ from the weight of hanging but it does require a professional acid free box. I use the Gaylord Archival company. They sell a kit that includes the box, acid free tissue, and gloves. I think it sells for about $75. I think this is a great option. You can also purchase the box and tissue separately or have a box made to a custom size. Use buffered tissue for gowns made from cellulose fibers like cotton, linen. Use unbuffered tissue for protein fibers like silk, wool. If you’re not sure, use unbuffered. The buffering is a alkaline substance added to counteract acids that may form on these cellulose fibers in the future.
Have your dress professionally cleaned (get a reference for a good dry cleaner from the bridal store) and hang it in an open area for a week to let the chemical products air. Button and zip all closures and remove any pins or excess items from the gown. Lightly Stuff the sleeves, bodice and anywhere that can hold it with a few sheets of lightly crumpled acid free tissue.

P1010033P1010018

Place a few sheets of your acid free tissue in the bottom of the box. Lay the gown in the box. If the gown is too large and needs to double up, put the skirt in first, lightly stuff with tissue and place gown bodice on top. You are creating soft, stuffed folds, avoiding any creases.

P1010030

Lay a few pieces of tissue on top, put the lid on and place in a cool, dry place. Wool will attract moths so on the rare occasion where wool has been used for bridal, I suggest placing a few cedar blocks wrapped in cotton and never touching the gown in the side of the box and checking it often for signs of moths. The wood has oils however and must not come in contact with the fabric. Check it periodically for signs of pests or moisture. 

Happy Storage to you!

Tuesday, September 3, 2013

Tasha Tudor


My maternal grandmother raised 16 children. I think I was about the 80th grandchild (and far from the last). As you can imagine, she didn't have the means or the time to give us many gifts.

 I have two treasures that came from her. One is a hand-quilted dolly blanket she made for me when I was 8 or so and the other is this collection of stories and poems, My Brimful Book, when I was about 6.


This is where my love for the children's book illustrator, Tasha Tudor, began. 
Her beautiful work transported me to a different place and time 


Tasha's drawings depict an ideal childhood. Her enchanting, soft palette watercolors show children's innocence and bring to life an earlier time. Both as a writer and illustrator, Tasha produced over 100 books including two that won Caldecott honors, Mother Goose, 1944 and 1 Is One, 1956.

As a single mother, Tasha raised most of her four children without running water or electricity. She gathered eggs, milked her goats, wove her own linen from homespun flax  and most often went barefoot; living purposefully as if in the1800's. 

She was certainly eccentric but her stories and illustrations have been admired for over 70 years.


Framed illustrations from Mother Goose are available in our shop.